What’s the most effective way of building an email list?
There is no definitive answer to that question. Among all the different ways of building an email list, using an optin plugin is a popular choice.
When it comes to opt-in plugins, you have several choices. But not all of them are up to the mark. Luckily, there is a plugin which comes with all the necessary options for creating effective optins. I am talking about Bloom.
[wp-compear id=”119788″]
Coming from
Elegant Themes,
Bloom is one of the leading optin plugins for WordPress. If you are looking for a solid, reliable optin plugin to grow your email list, Bloom should be one of your top choices.
In today’s post, I am going to take an in-depth look into Bloom and find out how you can use it to your advantage.
Creating an Optin with Blom
Once you have installed and activated the plugin, it will create a new menu item titled ‘Bloom’ in your website dashboard.
To create a new optin, go to Bloom > Optin Forms. Click the ‘NEW OPTIN’ button. This will take you to a screen like the following –
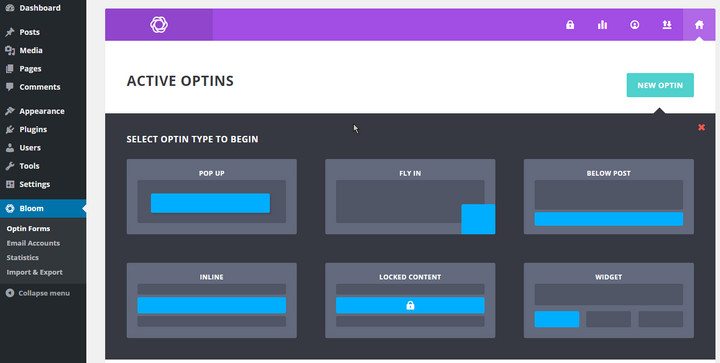
As you can see, the plugin offers six types of optins. They are –
- Pop Up: This is the most familiar type of optin. The optin will pop up according to your chosen settings.
- Fly In: This optin will appear from one corner.
- Below Post: As you can guess, this optin will be displayed below the posts.
- Inline: This optin will be displayed inside your contents. You have to use a shortcode to display the optin.
- Locked Content: If you want to offer content upgrade, this optin type is the best choice for you.
- Widget: If you want to display your optin in a widget, you should choose this type.
Customizing the Optin
Once you have chosen the type of optin, you will be taken to the next screen.
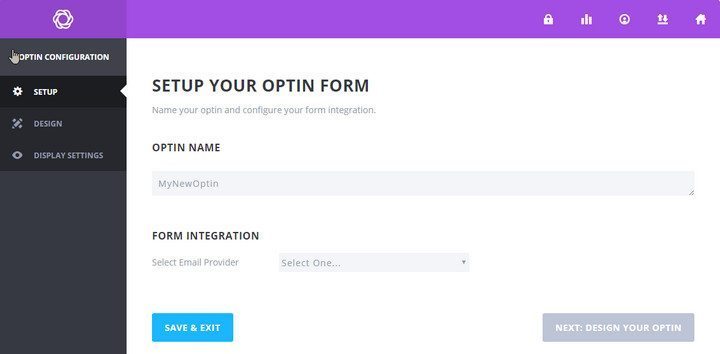
First of all, you can provide a name for the optin. Next, there is the form integration section. Here, you can choose the email marketing service you use. Bloom supports all common email marketing and business management platforms. There is also an option to provide custom HTML code.
Choose your preferred form integration method and connect the account. Then, click the ‘Next’ button to start designing your option.
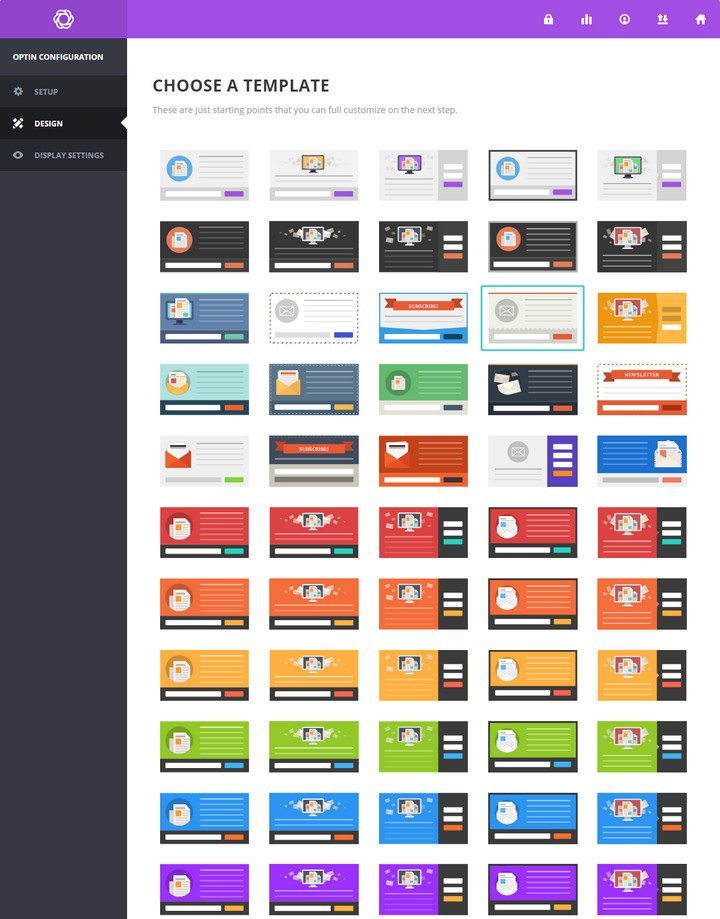
At this point, you will be provided with a list of the available templates.
Bloom comes with a lot of readymade templates. Choose the one which suits your requirement and click ‘Next’.
Now that you have chosen the type and template, it is time to customize the design. Bloom offers a diverse range of customizing options for your optins. First of all, there are two separate text areas to provide the title and optin message. You can choose the color, alignment for the text and make them bold or italic too.
Image Settings
Obviously, you can choose a custom image for your optin. What’s more, it is also possible to choose the image orientation. Available orientation options include image above text, below text, left or right of text. There are various options for the image loading animation too. If you want to hide the image in mobile devices, there is a checkbox for that.
Optin Styling
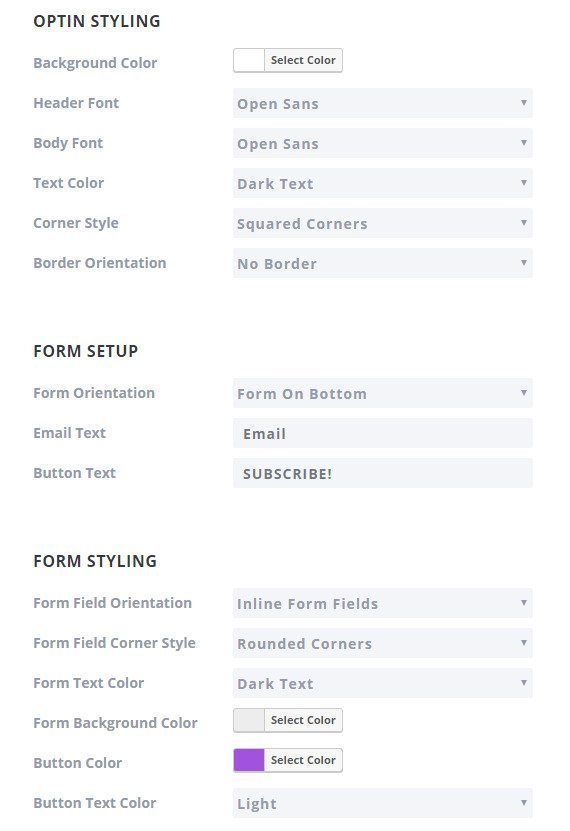
In this section, you can configure the style for the optin. First of all, you can choose the optin background color. Then, there are separate options for choosing the header font, body font, text color, border orientation, etc.
Form Setup
This section enables you to choose the form configuration options. You will find different options for choosing from orientation, email text, and button text.
Other Options
There are several other styling options below. Among them, you will find options for choosing the text color, button color, form background color, form edge style, footer text, success message text, etc. If you want to apply custom styling, the ‘Custom CSS’ box is located towards the end of the page.
Once you have configured the styling options, click the ‘Next’ button.
The Display Settings
This section helps you to choose where and when the optin should be displayed. The first section is for configuring the optin loading settings.
When to Display
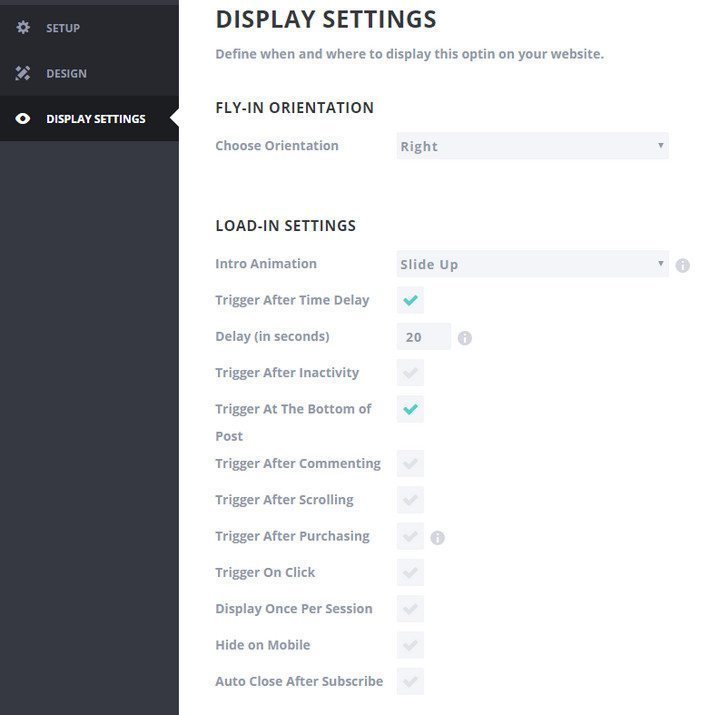
In the ‘Intro Animation’ field, you can choose the animation for the optin. Then, there are various configurable display triggers.
The plugin could be displayed after a specific amount of time, specific period of inactivity, at the bottom of the post, after scrolling a certain percentage of the post, after making a purchase, after leaving a comment, after clicking on a specific element on the page, etc.
You can also choose to display the optin once per session,
hide on mobile devices, and close the optin once the visitor has subscribed.
Where to Display
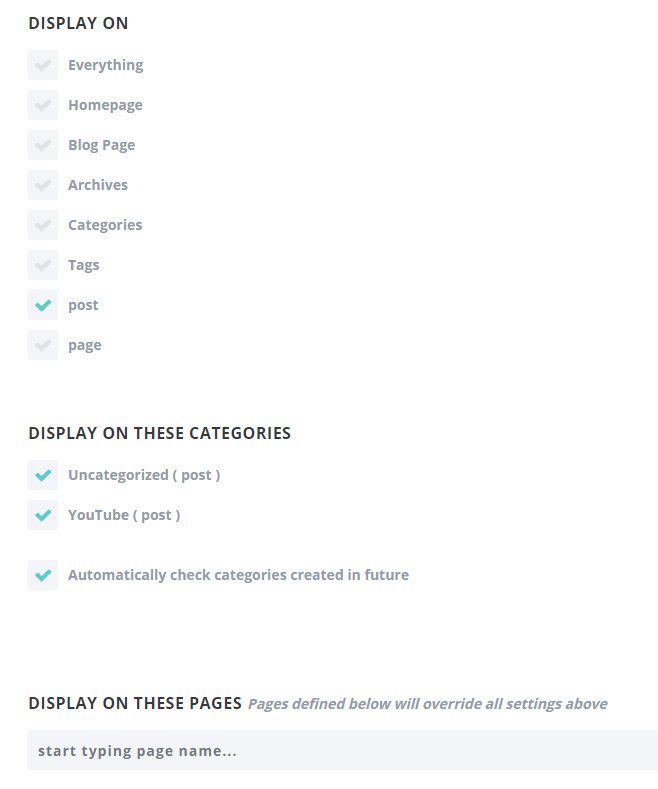
Down the page, you will find the options for choosing where the optin should be displayed. It is possible to display the optin on the whole site, or display in any or all of these locations – the homepage, blog, archive, category pages, tags, posts, and pages.
If you want, you can choose some specific categories for displaying the optin. It is also possible to choose specific posts and/or pages where the optin should be displayed. These will override all the settings configured above.
Once you have made the necessary changes, click ‘Save & Exit’. This will save the optin and take you back to the optin listing page.
Managing the Optins
You will find a list of your optins at Bloom > Optin Forms page. The optins will be divided into active and inactive ones. You will find the number of impressions, conversions, and the conversion rate for each optin. There are options to enable, disable, delete, duplicate, or change the optin settings.
For the inline optin, there will also be a link to get the optin shortcode. Activating an inactive optin is very easy. You just have to click the check mark and it will become active.
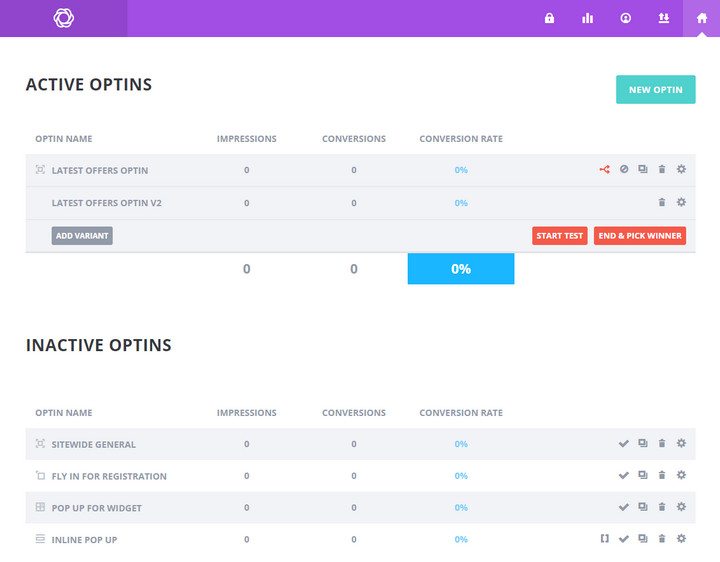 Bloom also supports A/B testing of your active
 optins. To do that, you have to click the A/B
Testing icon. Then, click ‘ADD VARIANT’. In the next screen, you can make the necessary changes. Click ‘Save & Exit’ once you are done. Finally, click ‘Start Test’ to begin the A/B testing. You can pause or end the testing anytime you want.
Other Options
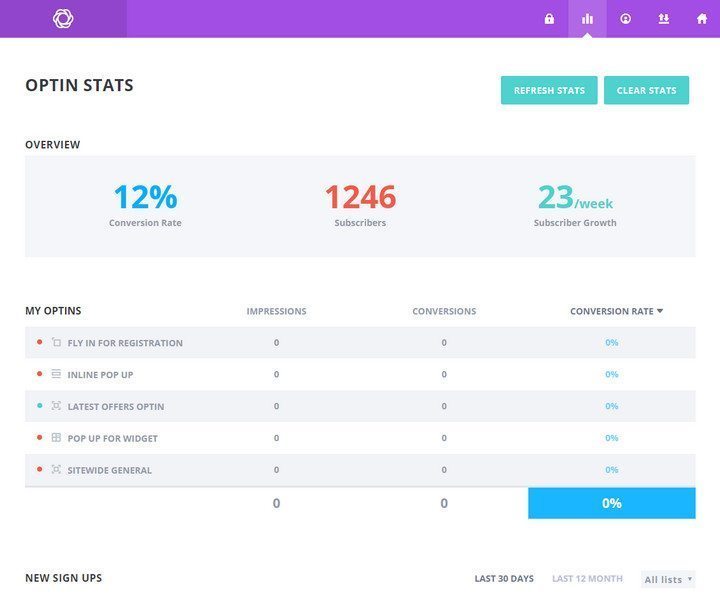
There are some other configuration options available. First of all, you can view the list of your email accounts at Bloom > Email Accounts. Detailed statistics is available at Bloom > Statistics. That page includes the overall conversion rate, number of subscribers, subscriber growth, new subscriber information for last 30 days, last 12 months etc.
It is also possible to export or import Bloom settings to or from other WordPress sites which are also using Bloom. To do that, go to Bloom > Import & Export. You will find separate options for importing or exporting Blom settings.
Bloom Pricing
You have to be an Elegant Themes member to get the Bloom plugin. There are two options for you –
- You can get the Developer plan, which is priced at $89 per year. It includes access to all themes and plugins from Elegant Themes.
- There is also a Lifetime Access plan. Priced at $249, this plan includes lifetime access to all themes, plugins, and layered PSD files.
Final Verdict
As you can see, Bloom comes with everything you need for creating attractive, effective optins. While some of you might miss the exit-intent, this is actually a patented technology. That is why Bloom is not offering that feature. Other than that, it offers a complete optin management solution.
So, what do you think about Bloom? Does it offer everything you want in an optin plugin? Let me know by leaving a comment below.





 5 Awards






 As you can see, the plugin offers six types of optins. They are –
 First of all, you can provide a name for the optin. Next, there is the form integration section. Here, you can choose the email marketing service you use. Bloom supports all common email marketing and business management platforms. There is also an option to provide custom HTML code.
Choose your preferred form integration method and connect the account. Then, click the ‘Next’ button to start designing your option.
 At this point, you will be provided with a list of the available templates. Bloom comes with a lot of readymade templates. Choose the one which suits your requirement and click ‘Next’.
Now that you have chosen the type and template, it is time to customize the design. Bloom offers a diverse range of customizing options for your optins. First of all, there are two separate text areas to provide the title and optin message. You can choose the color, alignment for the text and make them bold or italic too.
Image Settings
Obviously, you can choose a custom image for your optin. What’s more, it is also possible to choose the image orientation. Available orientation options include image above text, below text, left or right of text. There are various options for the image loading animation too. If you want to hide the image in mobile devices, there is a checkbox for that.
Optin Styling
 In this section, you can configure the style for the optin. First of all, you can choose the optin background color. Then, there are separate options for choosing the header font, body font, text color, border orientation, etc.
Form Setup
This section enables you to choose the form configuration options. You will find different options for choosing from orientation, email text, and button text.
Other Options
There are several other styling options below. Among them, you will find options for choosing the text color, button color, form background color, form edge style, footer text, success message text, etc. If you want to apply custom styling, the ‘Custom CSS’ box is located towards the end of the page.
Once you have configured the styling options, click the ‘Next’ button.
 In the ‘Intro Animation’ field, you can choose the animation for the optin. Then, there are various configurable display triggers.
The plugin could be displayed after a specific amount of time, specific period of inactivity, at the bottom of the post, after scrolling a certain percentage of the post, after making a purchase, after leaving a comment, after clicking on a specific element on the page, etc.
You can also choose to display the optin once per session,
  Down the page, you will find the options for choosing where the optin should be displayed. It is possible to display the optin on the whole site, or display in any or all of these locations – the homepage, blog, archive, category pages, tags, posts, and pages.
If you want, you can choose some specific categories for displaying the optin. It is also possible to choose specific posts and/or pages where the optin should be displayed. These will override all the settings configured above.
Once you have made the necessary changes, click ‘Save & Exit’. This will save the optin and take you back to the optin listing page.
 Bloom also supports A/B testing of your active optins. To do that, you have to click the A/B
Testing icon. Then, click ‘ADD VARIANT’. In the next screen, you can make the necessary changes. Click ‘Save & Exit’ once you are done. Finally, click ‘Start Test’ to begin the A/B testing. You can pause or end the testing anytime you want.
 It is also possible to export or import Bloom settings to or from other WordPress sites which are also using Bloom. To do that, go to Bloom > Import & Export. You will find separate options for importing or exporting Blom settings.
